Using 3D text effect as main design element wasn't something new. I'm pretty certain that most of us has been seen 3D text in many place like magazine, poster or in the internet. Years ago, we need 3d application and some skills to create believable 3d text. But since Adobe released Photoshop CS5 in 2010, we really can depend on it to create cool 3d text. Feeling anxious about this topic? If you really want to learn, keep on reading to find out how we're going to make it.
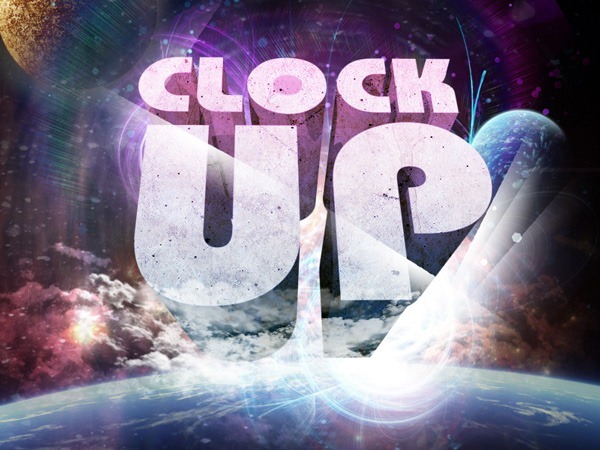
Preview of Final Results
Clock Up.zip | 9.67 MB
“Clock Up” Wallpaper Photoshop Tutorial
Step 1
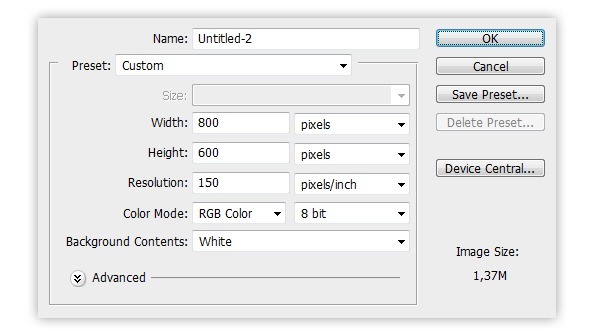
Inside Photoshop, create a
new document with
800x600 px wide with
150dpi resolution.
Step 2
Fill the
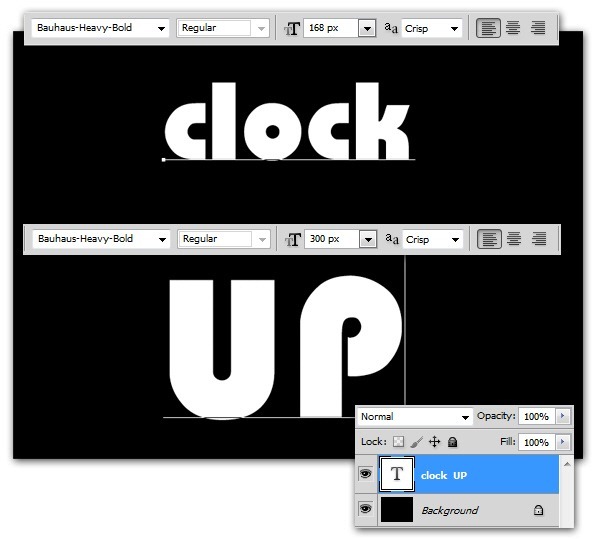
background layer with black then type the text you want, mine was 'clock UP'. For optimal result, choose thick font with unique shape. As for the text color, make sure you set it white.
I assume you type the same word as i do, so arrange the word 'clock' to
168px size, whereas the word 'UP' reside below it with larger size, around
300px.
Step 3
Show the
Character panel ( from the
Window> Character menu if you didn't know how ). Inside the
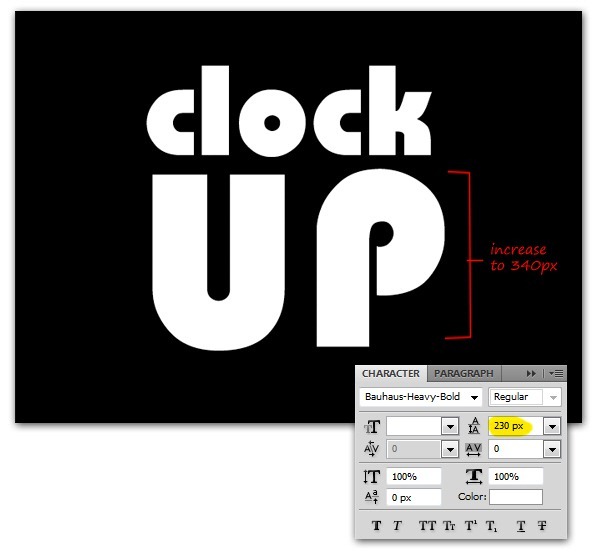
Character panel, set the
leading to 230px. This will reduce the gap between 'clock' and 'UP' words. I'm also increase the font size for the word 'UP' to
340px, so both words wide is equally each other.
Step 4
Transform text to 3D by using the menu
3D> Repouse> Text Layer. When the Repousse Dialog appear,
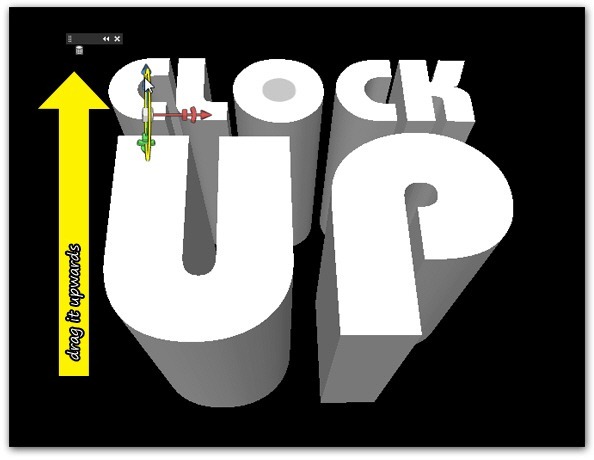
rotate the mesh option is activated by default. So now you can drag the 3D text vertically upwards to get the 3D text perspective like shown in the image below.
Step 5
Still inside the Repousse Dialog, look at the
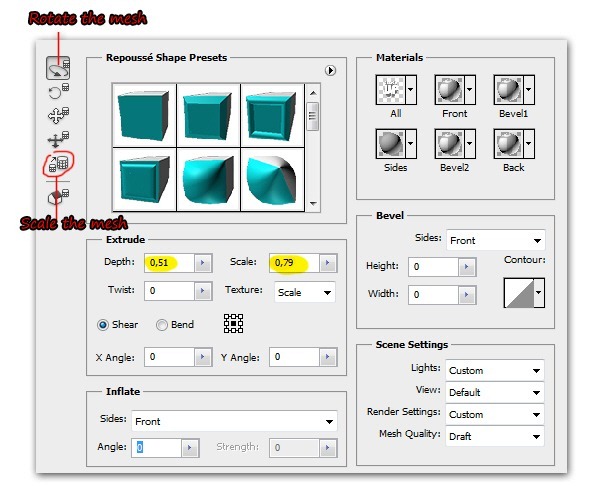
Extrude section. Reduce
Depth value to
0.51 and
Scale to
0,79. This will reduce extrudes depths while also enhance the perspective feels. In case you want bigger 3d text, click on the
Scale the mesh option. Drag to right direction to increase the 3D text, while drag to left would decrease it. Click
OK when you're done.
Step 6
The text layer become 3D layer now. Next, go to
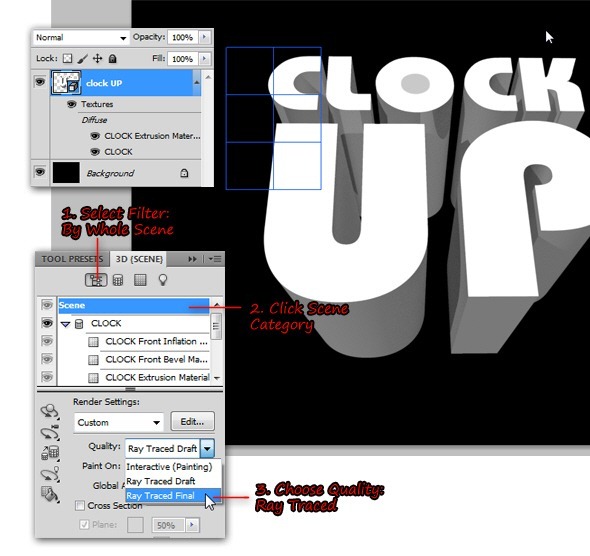
Window> 3D to show the 3D panel's. Inside the 3D panel, select
By Whole Scene filter. Click
Scene category then choose
Ray Traced Final from the
Quality option.
Photoshop will start rendering your 3D text, it will takes some time to render the 3D text (depending on your hardware and ram/memory ) so just wait until it's done.
Note: the rendering process will be interrupted if you do something ( such as moving the 3D text layer or change the layer blend mode ). If you coincidentally do this, just go back to 3D panel and set the Quality again, this way Photoshop will render the 3D text again.
Step 7
When the rendering is done, you'll get a smooth pretty 3D text like shown in the image below. Now go to
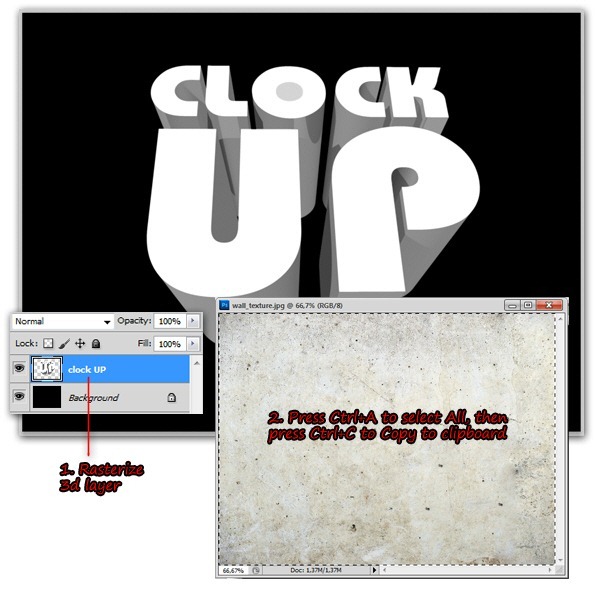
Layer> Rasterize> 3D to rasterize the 3d layer.From now, the rasterized 3d text layer will be called
'clock up' layer.
Open
texture image. Select All ( press
Ctrl+A ), then copy it to the clipboard via
Ctrl+C.
Step 8
Back to our 3D text document, press
Ctrl+V to paste the texture image above
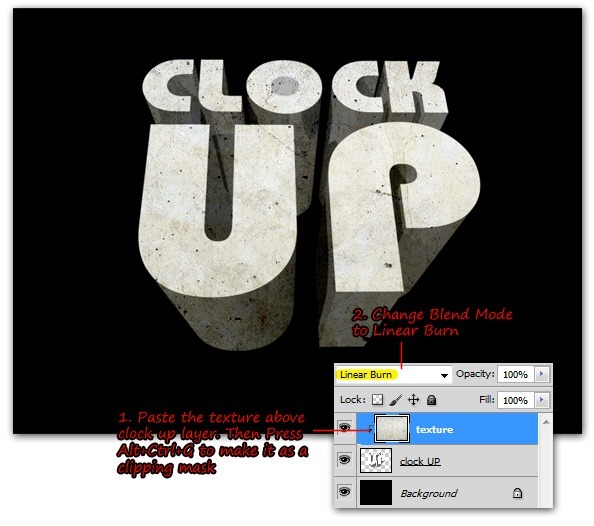
clock up layer. Make texture layer as a
clipping mask layer and then change the blend mode to
Linear Burn.
Step 9
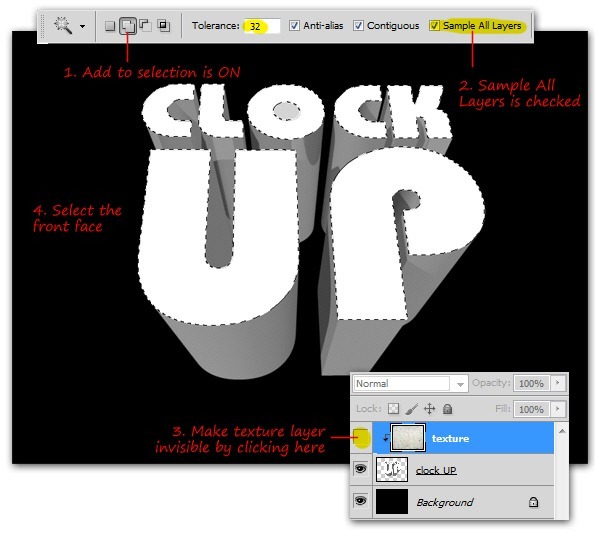
Hide
texture layer, then create a selection on the front face of the 3D text using
Magic Wand tool. To make selection easier, make sure you select the
Add to selection option and
Sample All Layer is checked from the option
bar.
Page 2 of 3
Step 10
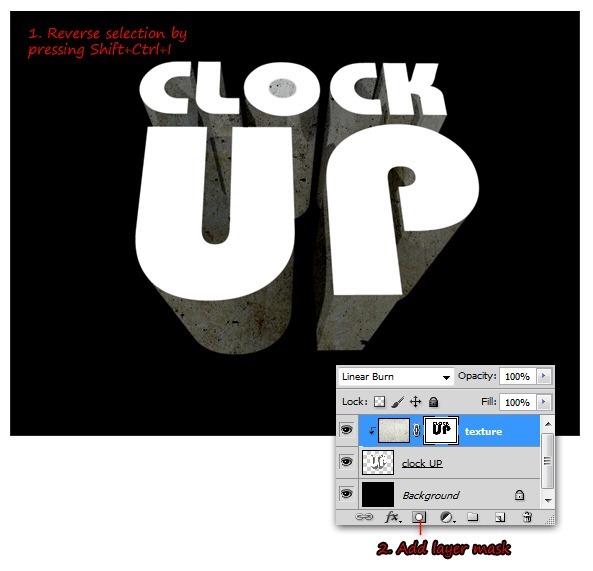
Reverse selection by pressing
Shift+Ctrl+I. Make sure you're on the
texture layer, now click
Add layer mask button to transform the selection into
layer mask. Now you can see the texture only appears inside the extrusion areas.
Step 11
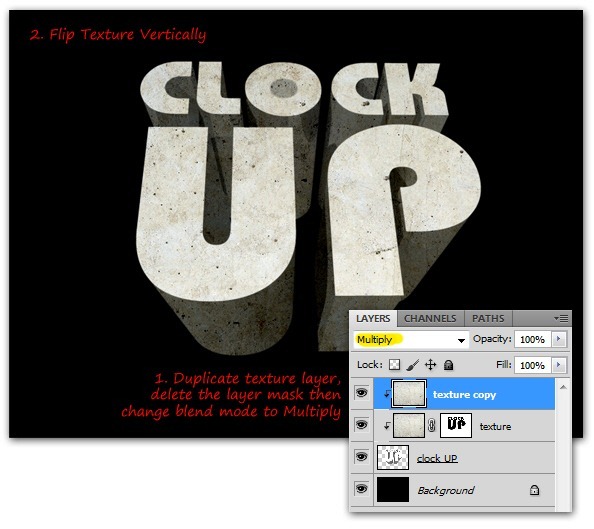
Make a copy of
texture layer (simply pressing
Ctrl+J would works) then
clear the layer mask, but
keep the clipping mask activated.This time, change the
blend mode to
multiply.
Step 12
Back to
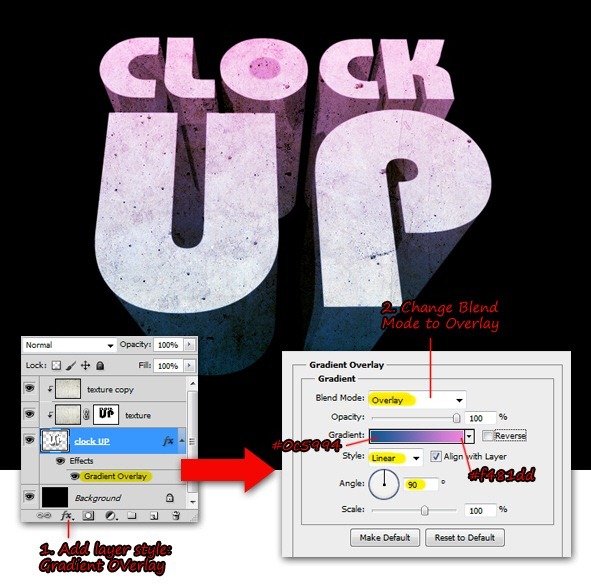
clock up layer, add
Gradient Overlay for it. Inside Gradient Overlay dialog, choose
Overlay as the blend
mode then adjust gradient color, so it will be mix between blue and purple color.
Step 13
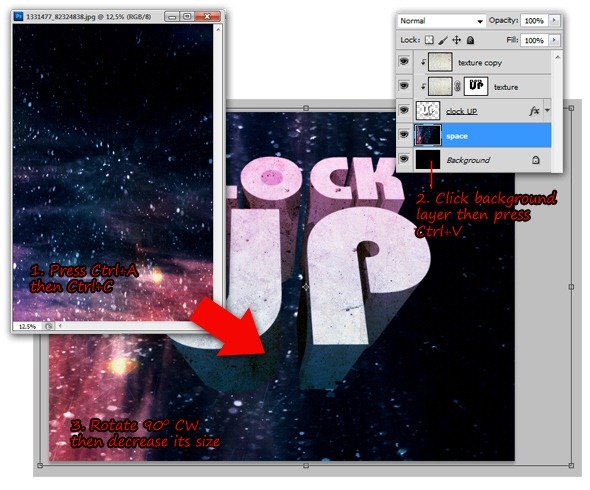
Open
space universe image, select then make a copy of it below
clock up layer, rename it to
space layer. Go toed it
> Transform> Rotate 90 CW menu to rotate space image. Later, use free transform command ( press Ctrl
+T ) to decrease space image size.
Step 14
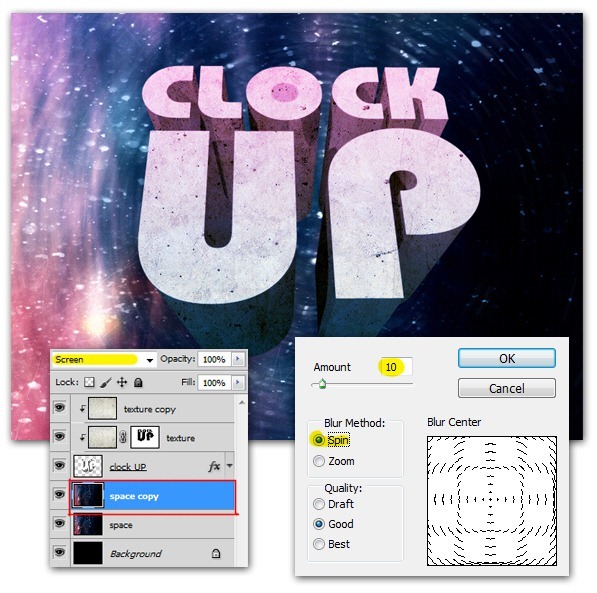
Duplicate space layer by pressing
Ctrl+J and change the
blend mode to
Screen. Now blur the
space copy layer by using
Filter> Blur> Radial Blur.
Step 15
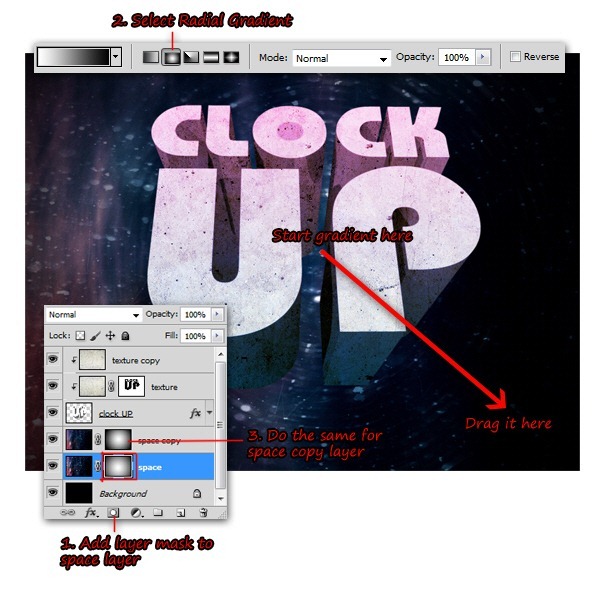
Go back to the original
space layer then
add a layer mask. Use the
radialGradient tool ( with gradient color from
white to black ) to
mask the
space layer. When done, do the same for
space copy layer.
Step 16
Open
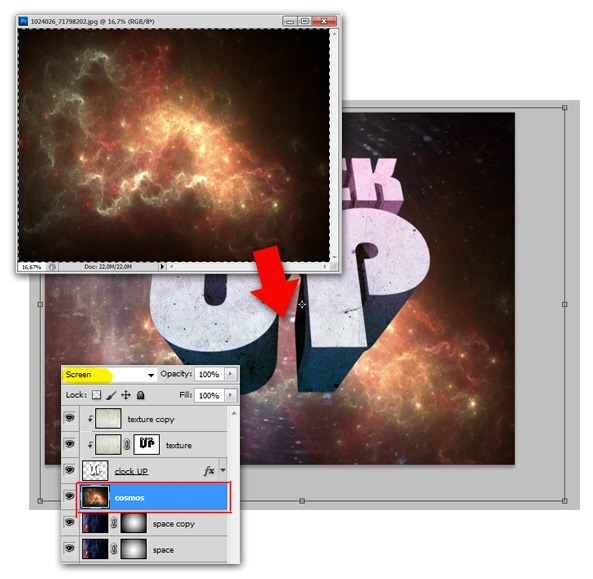
cosmos image, select then copy it below
clock up layer but above
space layers. Change its
blend mode to Screen
then decrease cosmos image size to fit the canvas (
Edit> Free Transform or press
Ctrl+T ).
Step 17
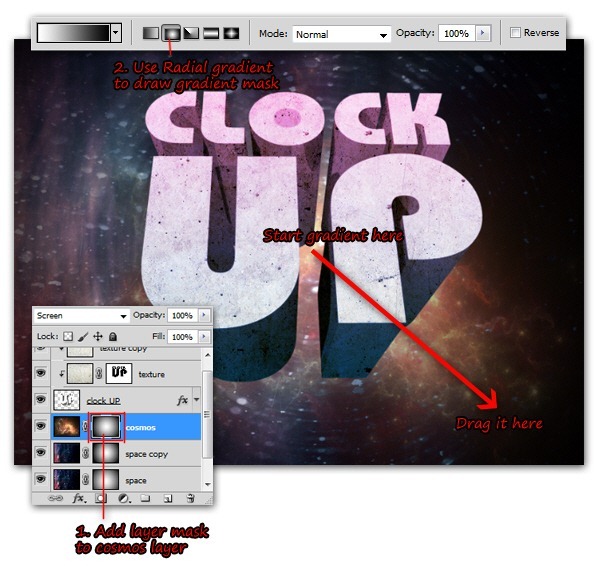
Add a
layer mask to
cosmos layer, then redo drawing
gradient mask using
radialGradient tool (like we did in
step 15 ).
Step 18
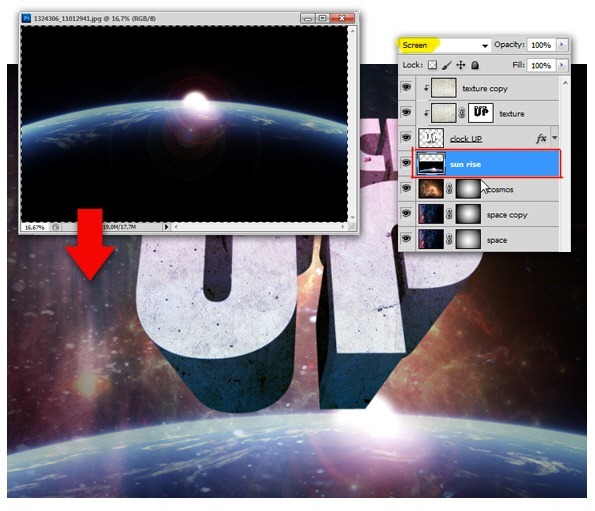
Open the
sun rise image. Select and then copy it between
clock up and
cosmos layer. Change the layer
blend mode to
Screen then adjust its position using the
Move tool.
Why we're using blend mode
screen so often? Simply because using blend mode
Screen will
hide all the black colors. Thus, making our work easier because all the stock images (planet, space, cosmos) will blend easily, since they all having black background..
Step 19
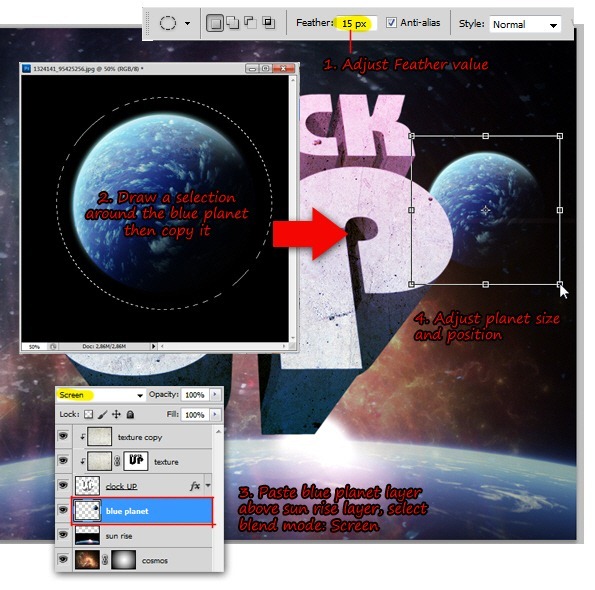
Open
blue planet image, select it using
Elliptical Marquee tool with
Feather value around
15px. Then
copy-paste it between the
clock up and
sun rise layer. As usual, change the
blend mode to
Screen and then adjust its size and position like shown in the below screenshot.
Step 20
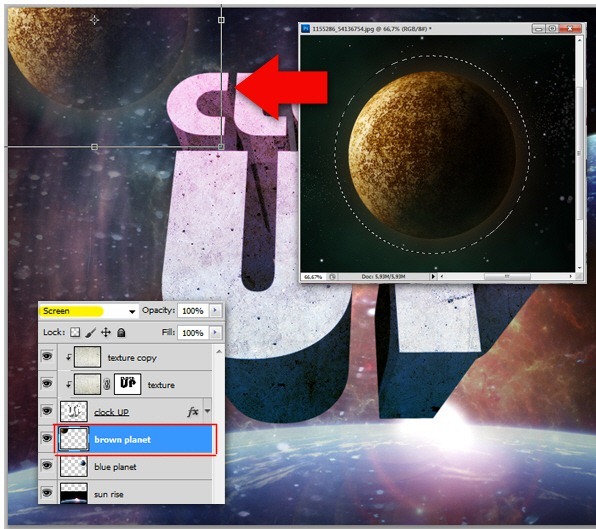
Open
another planet image which is brown colored planet. Use the same selection method in
step 19 to select this brown planet. Place
brown planet layer above
blue planet layer, don't forget to change the
blend mode and adjust the planet size/position.






 Designing good looking clean and functional Web layouts is an essential part of a Web Designers life. In this tutorial we are going to create a clean and professional Web layout in Photoshop from scratch. Along the way you can learn useful methods to create designs. So get started!
