Pages

Wednesday, June 22, 2011

Create a “Clock Up” Wallpaper in Photoshop

Using 3D text effect as main design element wasn't something new. I'm pretty certain that most of us has been seen 3D text in many place like magazine, poster or in the internet. Years ago, we need 3d application and some skills to create believable 3d text. But since Adobe released Photoshop CS5 in 2010, we really can depend on it to create cool 3d text. Feeling anxious about this topic? If you really want to learn, keep on reading to find out how we're going to make it.

Preview of Final Results

final-result 

Clock Up.zip | 9.67 MB  


“Clock Up” Wallpaper Photoshop Tutorial 

Step 1

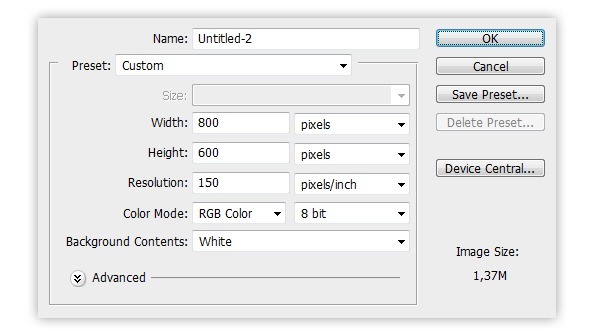
Inside Photoshop, create a new document with 800x600 px wide with 150dpi resolution.
step-01

Step 2

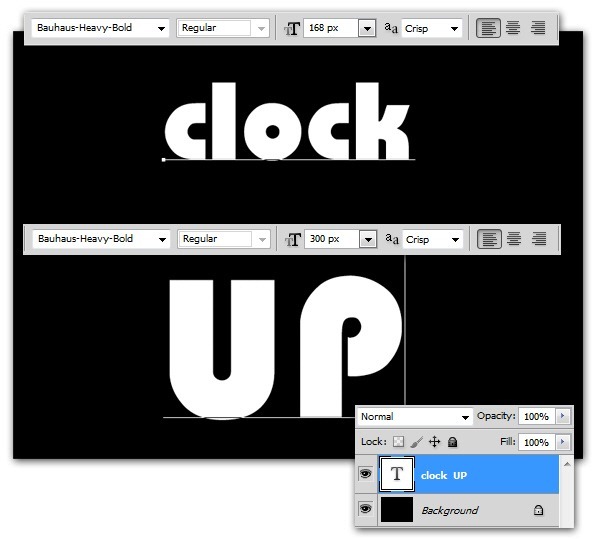
Fill the background layer with black then type the text you want, mine was 'clock UP'. For optimal result, choose thick font with unique shape. As for the text color, make sure you set it white.
I assume you type the same word as i do, so arrange the word 'clock' to 168px size, whereas the word 'UP' reside below it with larger size, around 300px.
step-02

Step 3

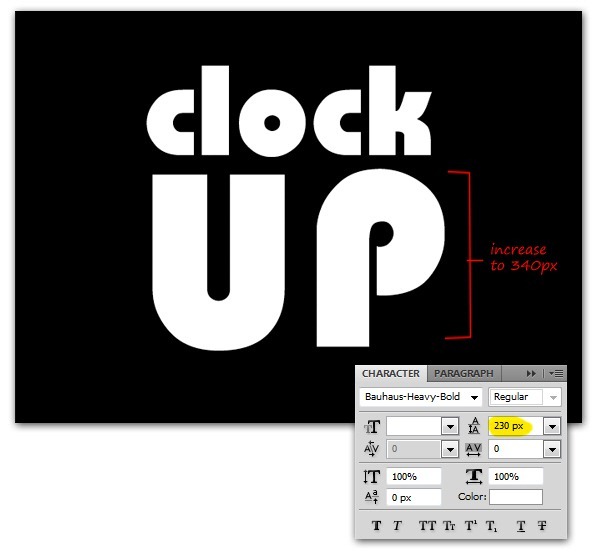
Show the Character panel ( from the Window> Character menu if you didn't know how ). Inside the Character panel, set the leading to 230px. This will reduce the gap between 'clock' and 'UP' words. I'm also increase the font size for the word 'UP' to 340px, so both words wide is equally each other.
step-03

Step 4

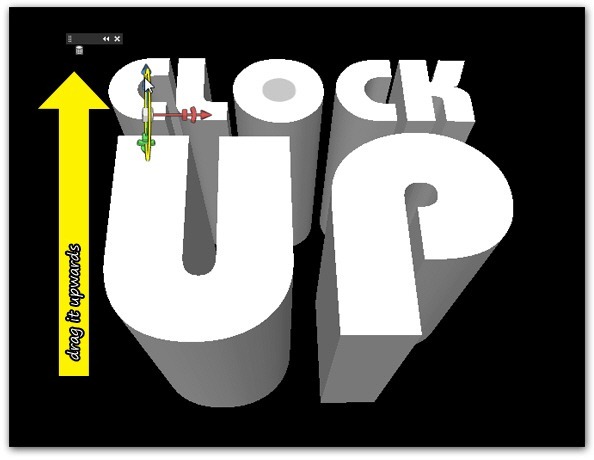
Transform text to 3D by using the menu 3D> Repouse> Text Layer. When the Repousse Dialog appear, rotate the mesh option is activated by default. So now you can drag the 3D text vertically upwards to get the 3D text perspective like shown in the image below.
step-04

Step 5

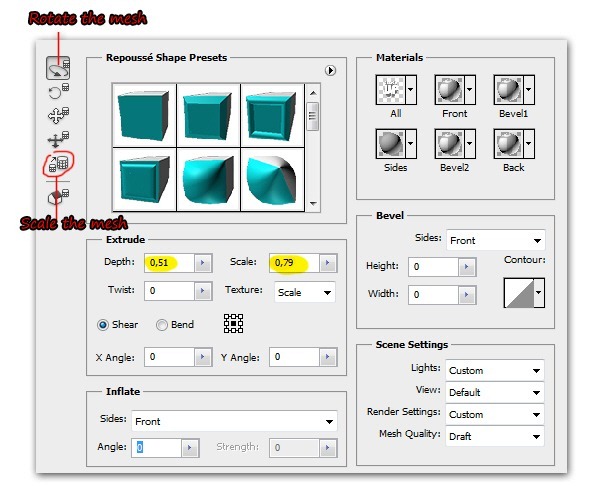
Still inside the Repousse Dialog, look at the Extrude section. Reduce Depth value to 0.51 and Scale to 0,79. This will reduce extrudes depths while also enhance the perspective feels. In case you want bigger 3d text, click on the Scale the mesh option. Drag to right direction to increase the 3D text, while drag to left would decrease it. Click OK when you're done.
step-05

Step 6

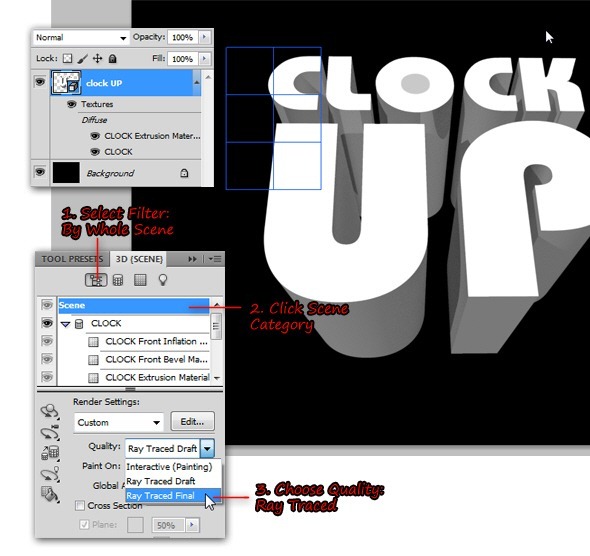
The text layer become 3D layer now. Next, go to Window> 3D to show the 3D panel's. Inside the 3D panel, select By Whole Scene filter. Click Scene category then choose Ray Traced Final from the Quality option.
Photoshop will start rendering your 3D text, it will takes some time to render the 3D text (depending on your hardware and ram/memory ) so just wait until it's done.
Note: the rendering process will be interrupted if you do something ( such as moving the 3D text layer or change the layer blend mode ). If you coincidentally do this, just go back to 3D panel and set the Quality again, this way Photoshop will render the 3D text again.
step-06

Step 7

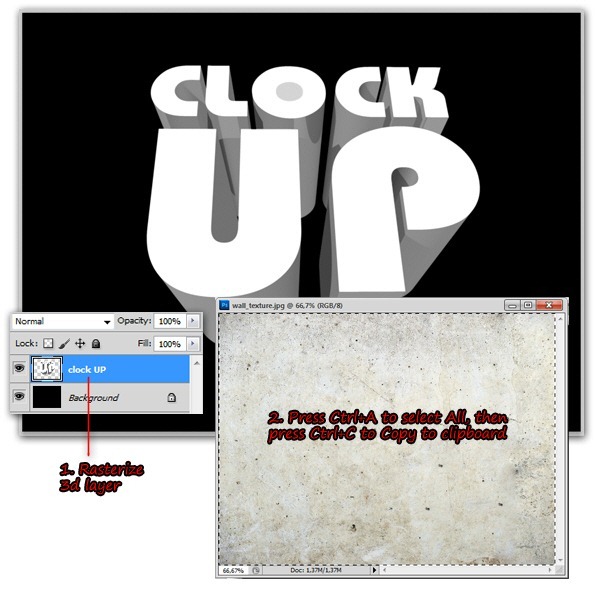
When the rendering is done, you'll get a smooth pretty 3D text like shown in the image below. Now go to Layer> Rasterize> 3D to rasterize the 3d layer.From now, the rasterized 3d text layer will be called 'clock up' layer.
Open texture image. Select All ( press Ctrl+A ), then copy it to the clipboard via Ctrl+C.
step-07

Step 8

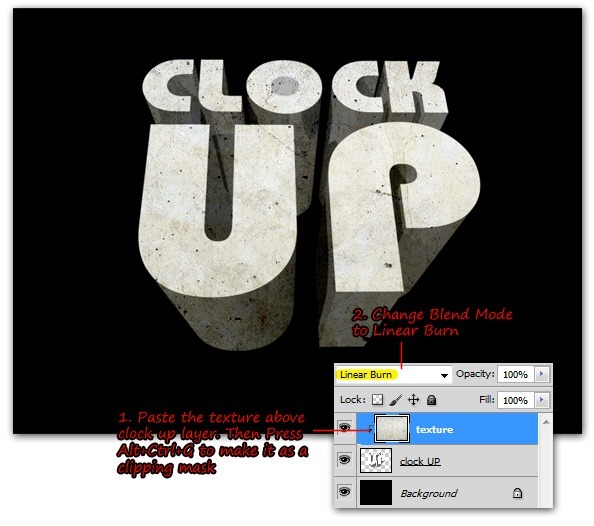
Back to our 3D text document, press Ctrl+V to paste the texture image above clock up layer. Make texture layer as a clipping mask layer and then change the blend mode to Linear Burn.
step-08

Step 9

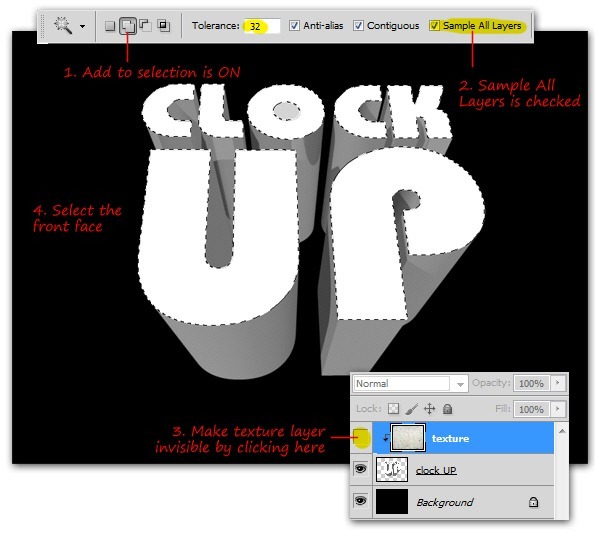
Hide texture layer, then create a selection on the front face of the 3D text using Magic Wand tool. To make selection easier, make sure you select the Add to selection option and Sample All Layer is checked from the option bar.
step-09


Step 10

Reverse selection by pressing Shift+Ctrl+I. Make sure you're on the texture layer, now click Add layer mask button to transform the selection into layer mask. Now you can see the texture only appears inside the extrusion areas.
step-10

Step 11

Make a copy of texture layer (simply pressing Ctrl+J would works) then clear the layer mask, but keep the clipping mask activated.This time, change the blend mode to multiply.
step-11

Step 12

Back to clock up layer, add Gradient Overlay for it. Inside Gradient Overlay dialog, choose Overlay as the blend mode then adjust gradient color, so it will be mix between blue and purple color.
step-12

Step 13

Open space universe image, select then make a copy of it below clock up layer, rename it to space layer. Go toed it> Transform> Rotate 90 CW menu to rotate space image. Later, use free transform command ( press Ctrl+T ) to decrease space image size.
step-13

Step 14

Duplicate space layer by pressing Ctrl+J and change the blend mode to Screen. Now blur the space copy layer by using Filter> Blur> Radial Blur.
step-14

Step 15

Go back to the original space layer then add a layer mask. Use the radialGradient tool ( with gradient color from white to black ) to mask the space layer. When done, do the same for space copy layer.
step-15

Step 16

Open cosmos image, select then copy it below clock up layer but above space layers. Change its blend mode to Screen then decrease cosmos image size to fit the canvas ( Edit> Free Transform or press Ctrl+T ).
step-16

Step 17

Add a layer mask to cosmos layer, then redo drawing gradient mask using radialGradient tool (like we did instep 15 ).
step-17

Step 18

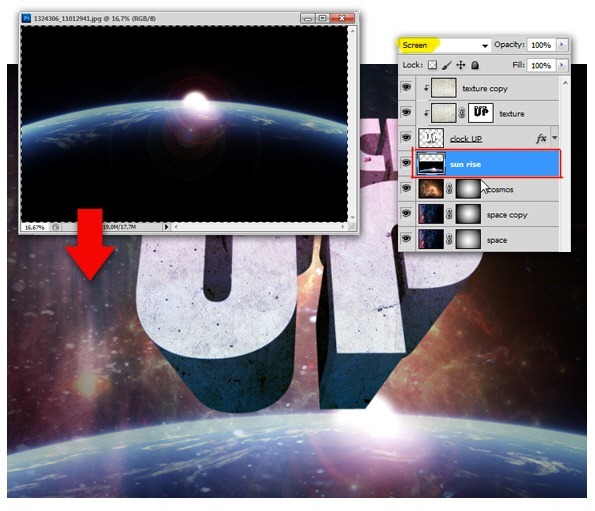
Open the sun rise image. Select and then copy it between clock up and cosmos layer. Change the layer blend mode to Screen then adjust its position using the Move tool.
Why we're using blend mode screen so often? Simply because using blend mode Screen will hide all the black colors. Thus, making our work easier because all the stock images (planet, space, cosmos) will blend easily, since they all having black background..
step-18

Step 19

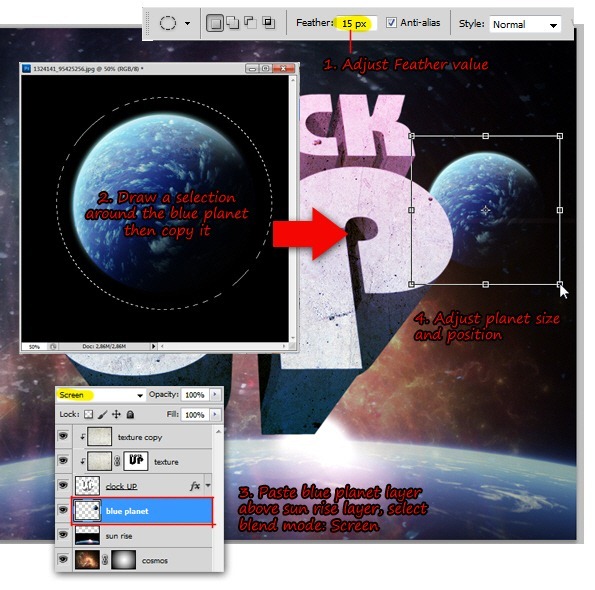
Open blue planet image, select it using Elliptical Marquee tool with Feather value around 15px. Then copy-paste it between the clock up and sun rise layer. As usual, change the blend mode to Screen and then adjust its size and position like shown in the below screenshot.
step-19

Step 20

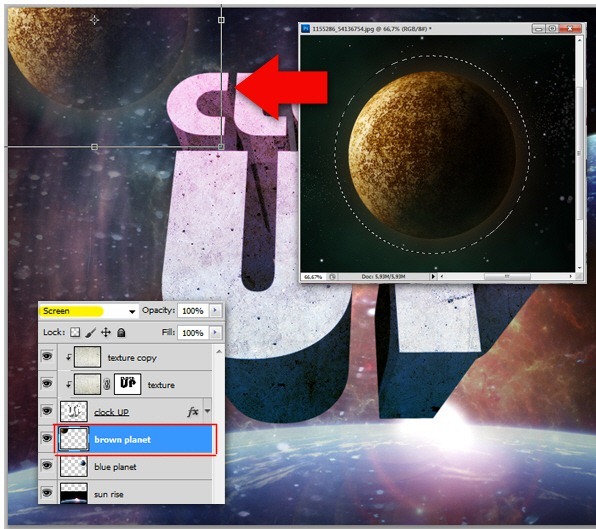
Open another planet image which is brown colored planet. Use the same selection method in step 19 to select this brown planet. Place brown planet layer above blue planet layer, don't forget to change the blend mode and adjust the planet size/position.
step-20 

Tuesday, June 21, 2011

Picsurgeon: "Noa Emberson"


Noa Emberson is a Graphic Designer, Illustrator and Photographer from Maui, Hawaii. He had a Bachelors of Fine Arts Degree in Graphic Design from the University of Hawaii at Manoa. His talent is evident in the range of work he has done (my personal favorite is his 'The Little Things" series). He is currently working on a new "Visual Mixtape" series.

Thank you so much for letting us have this interview! Here are my questions. First off, we'd like to know more about you. Can you tell us a little something about yourself? What influenced you to choose the creative fields as your career path?

My name is Noa Emberson and I was born and raised (mostly) in Hawaii, except for a few of my younger years spent overseas with my family in Brazil, Ecuador, and the Philippines (dad was a shrimp farmer).  Mom, on the other hand, was an artist and got me interested in drawing and painting at an early age.  In high school, I discovered digital photography and, more importantly, Photoshop.  After a brief stint of computer science courses in college I decided coding was not for me and I decided to switch to graphic design and haven't looked back since.
noa_emberson_01 


How does designing influence your everyday life? And does your environment influence your designs?

Well, I work in house as a graphic designer by day so I'm constantly playing with type and image.  That's what pays the bills.  While the projects that land in my lap aren't always the most inspiring, it always gives me an opportunity to practice my typography and layout skills.  If you can find inspiration in the small projects that come your way, finding inspiration in the big ones will be a snap, at least in my experience.  At night is when I take on freelance work, or work on personal projects and this is when I'm able to spread my wings and do the types of projects that I'm truly interested in.  In terms of environmental influences, working as a graphic designer in Hawaii is rougher than it seems!  The will power needed to not play in the sun all day instead of working can be draining!  I swear that people are more productive in places with snow outside their windows... Don't get me wrong though, I'm not complaining.
noa_emberson_02
noa_emberson_03 


Adobe Photoshop


Adobe Photoshop is a graphics editing program developed and published by Adobe Systems Incorporated.


Adobe's 2003 "Creative Suite" rebranding led to Adobe Photoshop 8's renaming to Adobe Photoshop CS. Thus, Adobe Photoshop CS5 is the 12th major release of Adobe Photoshop. The CS rebranding also resulted in Adobe offering numerous software packages containing multiple Adobe programs for a reduced price. Adobe Photoshop is released in two editions: Adobe Photoshop, and Adobe Photoshop Extended, with the Extended having extra features available. Adobe Photoshop Extended is included in all of Adobe's Creative Suite offerings except Design Standard, which includes the Adobe Photoshop edition.

Alongside Adobe Photoshop and Adobe Photoshop Extended, Adobe also publishes Adobe Photoshop Elements and Adobe Photoshop Lightroom, collectively called "The Adobe Photoshop Family" by Adobe. In 2008, Adobe released Adobe Photoshop Express, a free web-based image editing tool to edit photos directly on blogs and social networking sites.

Monday, June 20, 2011

Celebrity Plastic Surgery


Did Sandra Bullock Have a Nose Job?


Megan Fox's New Face


Angelina Jolie Claims She's Had No Plastic Surgery

"I haven't had anything done and I don't think I will," Angelina Jolie told the British paper. "But if it makes somebody happy then that's up to them. I'm not in somebody else's skin to know what makes them feel better about themselves. But I don't plan to do it myself."

 
Keira Knightley’s Nose Job Secret

Fans of Keira Knightley may be too focused on her large lips to realize that the period piece actress may have had some plastic surgery elsewhere on her face. Makemeheal.com suspects that the stylish brunette may have a rhinoplasty in her past, and we’re not the only ones.

At 24 years old, Keira Knightley is already one of Hollywood’s brightest stars, starring in everything from Indie hits to period pieces to major blockbusters. No matter what film she’s in, the one thing everyone wants to know is whether or not her large luscious lips are natural or the result of a lip augmentation.

It seems that Keira may have a lip implant in her upper lip to make her look extra sexy and she may have also gotten a nose job to help slim down and refine her nose

Older photos of Keira reveal a slightly wider nasal tip and bridge. Now Keira’s nose looks much more narrow from bridge to tip, indicating a well-done rhinoplasty.

Dr. Paul S. Nassif, a facial plastic and reconstructive surgeon and a rhinoplasty specialist in Beverly Hills, California, says, “Keira Knightly appears to have had rhinoplasty, as current photos show her nose to appear a bit smaller than it did in earlier photos. Her tip looks smaller, and her nasal bones look like they were brought in resulting in a narrower bridge. Overall, Keira looks very natural, and her nose does not appear overdone at all. “


Lindsay Lohan's Boob Job


Ryan Gosling's Nose Job

Robert Pattinson, Taylor Lautner Share Steamy Movie Awards Kiss


The third time was the charm for three-time MTV Movie Awards Best Kiss winners Robert Pattinson and Kristen Stewart ... or, at least, it should have been.

For the past two years, the "Twilight" stars have teased Movie Awards audiences with almost-kisses as they accepted their award. So on Sunday night (June 4), when presenters Blake Lively and Ryan Reynolds announced that RPattz and KStew had won for their smooch in "The Twilight Saga: Eclipse," it seemed this year's show would finally bring the big moment fans have been waiting for. Well, er, it wasn't.


"I feel bad because I don't feel like kissing you," Pattinson apologized to Stewart onstage. "You don't want to kiss me, do you?"

Stewart, though, seemed more willing. "Well, it's been a long time and I think maybe we should finally go for it," she said to cheers from the crowd.

But Pattinson still wasn't having it. "I just think there's someone else in the audience who I think will appreciate it a little more," he said.

Cue the camera cutting to a stone-faced Taylor Lautner.

"Go get him," Stewart encouraged.

Pattinson then took to the Gibson Amphitheatre floor running. As the audience screamed in excitement, he leaned over and gave Lautner a full-on smooch on the lips as his werewolf co-star wrapped an arm around him. Of course, Lautner also wiped his mouth immediately after (too much tongue?), but Pattinson wasn't done. Soon he was right back onstage going after Stewart — for real.

She squealed, "No!" and ran away laughing. "What? I want to take you back stage!" Pattinson said with a flirty grin. And the pair made their dramatic and hilarious exit ... but still no kiss.

LinkWithin

Related Posts Plugin for WordPress, Blogger...